|
PJRC Store
|
 Teensy 3.1, $19.80
Teensy 2.0, $16.00
Teensy++ 2.0, $24.00
USB Cable, $4.00
|
|
|
Teensy
|
Main Page
Teensy 3.1
 Getting Started
How-To Tips
Code Library
Projects
 Teensyduino
15.03.2018 — Omsi 2 Steam Edition Multi8 Update
The Steam Edition of OMSI 2 likely benefits from Steam features such as cloud saves, achievements, and community support. The update dated 15.03.2018 for the MULTi8 version could have included bug fixes, new features, or enhancements to the multiplayer aspect of the game.
Overview
Key Changes and Highlights
Gameplay & Simulation Tweaks
Vehicle & Systems Fixes
Map & Route Improvements
Modding & Content Pack Notes
User-Facing Improvements
Impact on Players and Community
Technical Notes (for advanced users/modders)
Community Feedback & Reception
Conclusion
The 15 March 2018 update for OMSI 2 Steam Edition MULTi8 delivered meaningful stability, simulation, and localization improvements that strengthened day-to-day gameplay and supported the modding ecosystem. While not a major overhaul, it represented an important quality-of-life and compatibility milestone that kept the simulator healthy for its dedicated community. OMSI 2 Steam Edition MULTi8 Update 15.03.2018
Suggested follow-ups for players
Related search suggestions (if you want to explore further)
OMSI 2 Steam Edition MULTi8 Update 15.03.2018: A Comprehensive Review and Guide
The OMSI 2 Steam Edition MULTi8 Update 15.03.2018 is a highly anticipated update for fans of the popular bus simulation game, OMSI 2. This update brings a multitude of new features, improvements, and bug fixes to the game, enhancing the overall gaming experience for players. In this article, we will delve into the details of this update, exploring its key features, changes, and what it means for the OMSI 2 community.
What is OMSI 2?
For those who may be new to the series, OMSI 2 (Omnibus Simulator 2) is a bus simulation game developed by Marcel Schafer and released in 2016. The game allows players to drive buses in a fictional city, complete with a variety of routes, buses, and passengers to manage. The game has gained a significant following worldwide, with players drawn to its realistic gameplay, challenging routes, and detailed bus models.
What is the OMSI 2 Steam Edition?
The OMSI 2 Steam Edition is a version of the game specifically designed for the Steam platform. This edition offers a range of benefits, including automatic updates, cloud saves, and integration with the Steam community features. The Steam Edition has become the go-to version for many OMSI 2 players, providing a convenient and streamlined gaming experience.
What does the MULTi8 Update 15.03.2018 bring?
The MULTi8 Update 15.03.2018 is a significant update for the OMSI 2 Steam Edition, bringing a range of new features, improvements, and bug fixes to the game. Some of the key changes include:
Key Features of the OMSI 2 Steam Edition MULTi8 Update 15.03.2018 The Steam Edition of OMSI 2 likely benefits
The OMSI 2 Steam Edition MULTi8 Update 15.03.2018 includes several key features that enhance the overall gaming experience. Some of these features include:
Installation and System Requirements
To install the OMSI 2 Steam Edition MULTi8 Update 15.03.2018, players will need to have the Steam client installed on their computer. The update will be automatically downloaded and installed through the Steam client.
The system requirements for OMSI 2 Steam Edition are:
Conclusion
The OMSI 2 Steam Edition MULTi8 Update 15.03.2018 is a significant update that brings a range of new features, improvements, and bug fixes to the game. With its multi-language support, new buses, improved graphics, and new routes and maps, this update is a must-have for fans of the game. Whether you're a seasoned OMSI 2 player or new to the series, this update provides a fresh and exciting experience that's sure to keep you entertained for hours on end.
What's next for OMSI 2?
The OMSI 2 development team has hinted at several upcoming updates and expansions, including new buses, routes, and features. Fans of the game can expect even more content and improvements in the coming months, further enhancing the OMSI 2 experience.
Join the OMSI 2 Community
If you're a fan of OMSI 2, be sure to join the community on Steam and other social media platforms. Share your experiences, tips, and feedback with other players, and stay up-to-date with the latest news and updates from the development team.
In conclusion, the OMSI 2 Steam Edition MULTi8 Update 15.03.2018 is a significant update that enhances the overall gaming experience for players. With its range of new features, improvements, and bug fixes, this update is a must-have for fans of the game. Key Changes and Highlights
Here’s a proper breakdown and narrative-style story around the OMSI 2 Steam Edition MULTi8 Update from March 15, 2018 — framed as a restoration or archival log for a virtual bus company.
In the world of hardcore bus simulation, few names command as much respect—and as much frustration—as OMSI 2 (Der Omnibussimulator). Developed by MR-Software and published by Aerosoft, this title remains the gold standard for realism, physics-based driving, and modding flexibility. However, its complex architecture means that not all updates are created equal.
The update labeled OMSI 2 Steam Edition MULTi8 Update 15.03.2018 occupies a unique place in the game’s lifecycle. Released in the spring of 2018, this patch arrived during a transitional period when the developers were stabilizing the Steam version (which includes Steam achievements, cloud saves, and automatic updates) while retaining compatibility with the physical DVD edition.
For many modders and map creators, the 15.03.2018 build represents a "golden baseline" – stable enough for daily driving, yet early enough to avoid some performance regressions introduced in later patches. This article dissects everything you need to know about this specific update.
It was a damp March evening in the digital world of OMSI 2, the beloved omnibus simulator that had kept virtual drivers at their desks for years. The Steam Edition, localized into eight languages (MULTi8 — English, German, French, Spanish, Italian, Russian, Polish, and Japanese), had become a global hub for bus enthusiasts. But by early 2018, the community felt a familiar creak: frame drops, AI quirks, and inconsistencies between DLCs.
Then came March 15, 2018.
If you have acquired this update as a standalone .exe or .7z archive (common from backup communities), follow these best practices:
Run as Administrator. The 2018 patch attempts to write to the registry key HKEY_CURRENT_USER\Software\MR-Software\OMSI 2. Without admin rights, the patch may partially fail.
Verify MULTi8 files: After installation, check that all eight language directories under OMSI 2\Fonts and OMSI 2\GUI are present. Missing languages indicate a corrupted patch.
The response to the March 15th update was, to put it mildly, divided.
The Good: For non-German speakers, it was a revelation. Suddenly, the complex scheduling menu (Timetable, Hof, Tour) made sense. Russian modding groups, who had built massive maps like "Bolshaya Koltsevaya Line," finally saw their native alphabet render correctly without workaround patches. Chinese players saw a surge in accessibility, leading to the boom of the OMSI community in East Asia.
The Bad (The "Modpocalypse" of 2018): Because the update changed the core OMSI.exe and several .dll files, it broke every mod reliant on direct memory addresses. Specifically:
Published by: Bus Simulation Archive
Target Version: OMSI 2 (Steam Edition) – MULTi8 – Update Package dated March 15th, 2018
By this update, the Steam Workshop integration was fully mature. This version allows users to subscribe to custom buses (like the MAN Lions Coach or retro Ikarus mods) and maps directly through the Steam client, eliminating the tedious manual file manipulation required in older non-Steam versions.
|
|
|
|
15.03.2018 — Omsi 2 Steam Edition Multi8 Update
This library
supports the Small OLED displays sold by Adafruit Industries.
Download: Adafruit_SSD1306.zip
Hardware Requirements
Adafruit sells these OLED displays in I2C and SPI interface.
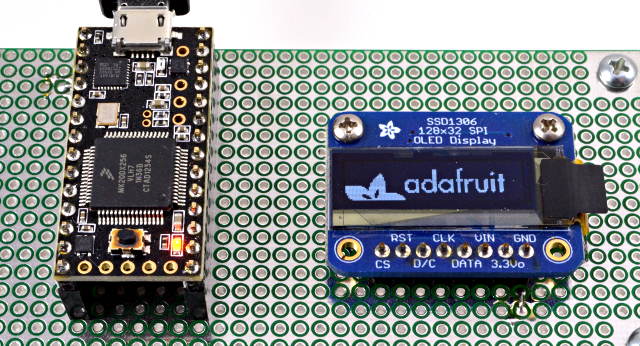
Adafruit 128x32 SPI OLED with Teensy 3.1
|
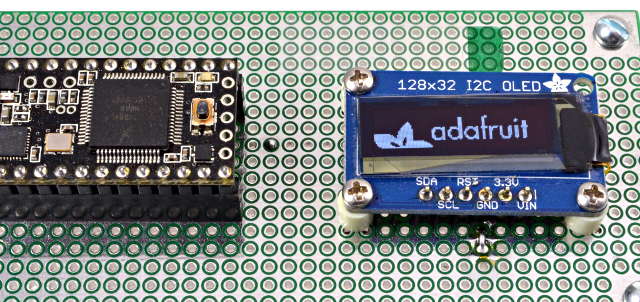
Adafruit 128x32 I2C OLED with Teensy 3.0
|
See below for the reverse-side wiring.
32 vs 64 Pixel Height
You may need to edit Adafruit_SSD1306.h to set the display height.
Look for this code and uncomment either 64 or 32 pixel height.
/*=========================================================================
    SSD1306 Displays
    -----------------------------------------------------------------------
    The driver is used in multiple displays (128x64, 128x32, etc.).
    Select the appropriate display below to create an appropriately
    sized framebuffer, etc.

    SSD1306_128_64  128x64 pixel display

    SSD1306_128_32  128x32 pixel display

    -----------------------------------------------------------------------*/
//   #define SSD1306_128_64
   #define SSD1306_128_32
/*=========================================================================*/
Example Program
This example program comes with the library. You can open it from the
File -> Examples -> Adafruit_SSD1306 -> ssd1306_128x32_spi menu.
/*********************************************************************
This is an example for our Monochrome OLEDs based on SSD1306 drivers

  Pick one up today in the adafruit shop!
  ------> http://www.adafruit.com/category/63_98

This example is for a 128x32 size display using SPI to communicate
4 or 5 pins are required to interface

Adafruit invests time and resources providing this open source code,
please support Adafruit and open-source hardware by purchasing
products from Adafruit!

Written by Limor Fried/Ladyada  for Adafruit Industries.
BSD license, check license.txt for more information
All text above, and the splash screen must be included in any redistribution
*********************************************************************/

#include <SPI.h>
#include <Wire.h>
#include <Adafruit_GFX.h>
#include <Adafruit_SSD1306.h>

// If using software SPI (the default case):
#define OLED_MOSI   9
#define OLED_CLK   10
#define OLED_DC    11
#define OLED_CS    12
#define OLED_RESET 13
Adafruit_SSD1306 display(OLED_MOSI, OLED_CLK, OLED_DC, OLED_RESET, OLED_CS);

/* Uncomment this block to use hardware SPI
#define OLED_DC     6
#define OLED_CS     7
#define OLED_RESET  8
Adafruit_SSD1306 display(OLED_DC, OLED_RESET, OLED_CS);
*/

#define NUMFLAKES 10
#define XPOS 0
#define YPOS 1
#define DELTAY 2

#define LOGO16_GLCD_HEIGHT 16
#define LOGO16_GLCD_WIDTH  16
static const unsigned char PROGMEM logo16_glcd_bmp[] =
{ B00000000, B11000000,
  B00000001, B11000000,
  B00000001, B11000000,
  B00000011, B11100000,
  B11110011, B11100000,
  B11111110, B11111000,
  B01111110, B11111111,
  B00110011, B10011111,
  B00011111, B11111100,
  B00001101, B01110000,
  B00011011, B10100000,
  B00111111, B11100000,
  B00111111, B11110000,
  B01111100, B11110000,
  B01110000, B01110000,
  B00000000, B00110000 };

#if (SSD1306_LCDHEIGHT != 32)
#error("Height incorrect, please fix Adafruit_SSD1306.h!");
#endif

void setup()   {
  Serial.begin(9600);

  // by default, we'll generate the high voltage from the 3.3v line internally! (neat!)
  display.begin(SSD1306_SWITCHCAPVCC);
  // init done

  display.display(); // show splashscreen
  delay(2000);
  display.clearDisplay();   // clears the screen and buffer

  // draw a single pixel
  display.drawPixel(10, 10, WHITE);
  display.display();
  delay(2000);
  display.clearDisplay();

  // draw many lines
  testdrawline();
  display.display();
  delay(2000);
  display.clearDisplay();

  // draw rectangles
  testdrawrect();
  display.display();
  delay(2000);
  display.clearDisplay();

  // draw multiple rectangles
  testfillrect();
  display.display();
  delay(2000);
  display.clearDisplay();

  // draw mulitple circles
  testdrawcircle();
  display.display();
  delay(2000);
  display.clearDisplay();

  // draw a white circle, 10 pixel radius
  display.fillCircle(display.width()/2, display.height()/2, 10, WHITE);
  display.display();
  delay(2000);
  display.clearDisplay();

  testdrawroundrect();
  delay(2000);
  display.clearDisplay();

  testfillroundrect();
  delay(2000);
  display.clearDisplay();

  testdrawtriangle();
  delay(2000);
  display.clearDisplay();

  testfilltriangle();
  delay(2000);
  display.clearDisplay();

  // draw the first ~12 characters in the font
  testdrawchar();
  display.display();
  delay(2000);
  display.clearDisplay();

  // draw scrolling text
  testscrolltext();
  delay(2000);
  display.clearDisplay();

  // text display tests
  display.setTextSize(1);
  display.setTextColor(WHITE);
  display.setCursor(0,0);
  display.println("Hello, world!");
  display.setTextColor(BLACK, WHITE); // 'inverted' text
  display.println(3.141592);
  display.setTextSize(2);
  display.setTextColor(WHITE);
  display.print("0x"); display.println(0xDEADBEEF, HEX);
  display.display();
  delay(2000);

  // miniature bitmap display
  display.clearDisplay();
  display.drawBitmap(30, 16,  logo16_glcd_bmp, 16, 16, 1);
  display.display();

  // invert the display
  display.invertDisplay(true);
  delay(1000);
  display.invertDisplay(false);
  delay(1000);

  // draw a bitmap icon and 'animate' movement
  testdrawbitmap(logo16_glcd_bmp, LOGO16_GLCD_HEIGHT, LOGO16_GLCD_WIDTH);
}


void loop() {

}


void testdrawbitmap(const uint8_t *bitmap, uint8_t w, uint8_t h) {
  uint8_t icons[NUMFLAKES][3];

  // initialize
  for (uint8_t f=0; f< NUMFLAKES; f++) {
    icons[f][XPOS] = random(display.width());
    icons[f][YPOS] = 0;
    icons[f][DELTAY] = random(5) + 1;

    Serial.print("x: ");
    Serial.print(icons[f][XPOS], DEC);
    Serial.print(" y: ");
    Serial.print(icons[f][YPOS], DEC);
    Serial.print(" dy: ");
    Serial.println(icons[f][DELTAY], DEC);
  }

  while (1) {
    // draw each icon
    for (uint8_t f=0; f< NUMFLAKES; f++) {
      display.drawBitmap(icons[f][XPOS], icons[f][YPOS], logo16_glcd_bmp, w, h, WHITE);
    }
    display.display();
    delay(200);

    // then erase it + move it
    for (uint8_t f=0; f< NUMFLAKES; f++) {
      display.drawBitmap(icons[f][XPOS], icons[f][YPOS],  logo16_glcd_bmp, w, h, BLACK);
      // move it
      icons[f][YPOS] += icons[f][DELTAY];
      // if its gone, reinit
      if (icons[f][YPOS] > display.height()) {
	icons[f][XPOS] = random(display.width());
	icons[f][YPOS] = 0;
	icons[f][DELTAY] = random(5) + 1;
      }
    }
   }
}


void testdrawchar(void) {
  display.setTextSize(1);
  display.setTextColor(WHITE);
  display.setCursor(0,0);

  for (uint8_t i=0; i < 168; i++) {
    if (i == '\n') continue;
    display.write(i);
    if ((i > 0) && (i % 21 == 0))
      display.println();
  }
  display.display();
}

void testdrawcircle(void) {
  for (int16_t i=0; i<display.height(); i+=2) {
    display.drawCircle(display.width()/2, display.height()/2, i, WHITE);
    display.display();
  }
}

void testfillrect(void) {
  uint8_t color = 1;
  for (int16_t i=0; i<display.height()/2; i+=3) {
    // alternate colors
    display.fillRect(i, i, display.width()-i*2, display.height()-i*2, color%2);
    display.display();
    color++;
  }
}

void testdrawtriangle(void) {
  for (int16_t i=0; i<min(display.width(),display.height())/2; i+=5) {
    display.drawTriangle(display.width()/2, display.height()/2-i,
                     display.width()/2-i, display.height()/2+i,
                     display.width()/2+i, display.height()/2+i, WHITE);
    display.display();
  }
}

void testfilltriangle(void) {
  uint8_t color = WHITE;
  for (int16_t i=min(display.width(),display.height())/2; i>0; i-=5) {
    display.fillTriangle(display.width()/2, display.height()/2-i,
                     display.width()/2-i, display.height()/2+i,
                     display.width()/2+i, display.height()/2+i, WHITE);
    if (color == WHITE) color = BLACK;
    else color = WHITE;
    display.display();
  }
}

void testdrawroundrect(void) {
  for (int16_t i=0; i<display.height()/2-2; i+=2) {
    display.drawRoundRect(i, i, display.width()-2*i, display.height()-2*i, display.height()/4, WHITE);
    display.display();
  }
}

void testfillroundrect(void) {
  uint8_t color = WHITE;
  for (int16_t i=0; i<display.height()/2-2; i+=2) {
    display.fillRoundRect(i, i, display.width()-2*i, display.height()-2*i, display.height()/4, color);
    if (color == WHITE) color = BLACK;
    else color = WHITE;
    display.display();
  }
}

void testdrawrect(void) {
  for (int16_t i=0; i<display.height()/2; i+=2) {
    display.drawRect(i, i, display.width()-2*i, display.height()-2*i, WHITE);
    display.display();
  }
}

void testdrawline() {
  for (int16_t i=0; i<display.width(); i+=4) {
    display.drawLine(0, 0, i, display.height()-1, WHITE);
    display.display();
  }
  for (int16_t i=0; i<display.height(); i+=4) {
    display.drawLine(0, 0, display.width()-1, i, WHITE);
    display.display();
  }
  delay(250);

  display.clearDisplay();
  for (int16_t i=0; i<display.width(); i+=4) {
    display.drawLine(0, display.height()-1, i, 0, WHITE);
    display.display();
  }
  for (int16_t i=display.height()-1; i>=0; i-=4) {
    display.drawLine(0, display.height()-1, display.width()-1, i, WHITE);
    display.display();
  }
  delay(250);

  display.clearDisplay();
  for (int16_t i=display.width()-1; i>=0; i-=4) {
    display.drawLine(display.width()-1, display.height()-1, i, 0, WHITE);
    display.display();
  }
  for (int16_t i=display.height()-1; i>=0; i-=4) {
    display.drawLine(display.width()-1, display.height()-1, 0, i, WHITE);
    display.display();
  }
  delay(250);

  display.clearDisplay();
  for (int16_t i=0; i<display.height(); i+=4) {
    display.drawLine(display.width()-1, 0, 0, i, WHITE);
    display.display();
  }
  for (int16_t i=0; i<display.width(); i+=4) {
    display.drawLine(display.width()-1, 0, i, display.height()-1, WHITE);
    display.display();
  }
  delay(250);
}

void testscrolltext(void) {
  display.setTextSize(2);
  display.setTextColor(WHITE);
  display.setCursor(10,0);
  display.clearDisplay();
  display.println("scroll");
  display.display();

  display.startscrollright(0x00, 0x0F);
  delay(2000);
  display.stopscroll();
  delay(1000);
  display.startscrollleft(0x00, 0x0F);
  delay(2000);
  display.stopscroll();
  delay(1000);
  display.startscrolldiagright(0x00, 0x07);
  delay(2000);
  display.startscrolldiagleft(0x00, 0x07);
  delay(2000);
  display.stopscroll();
}
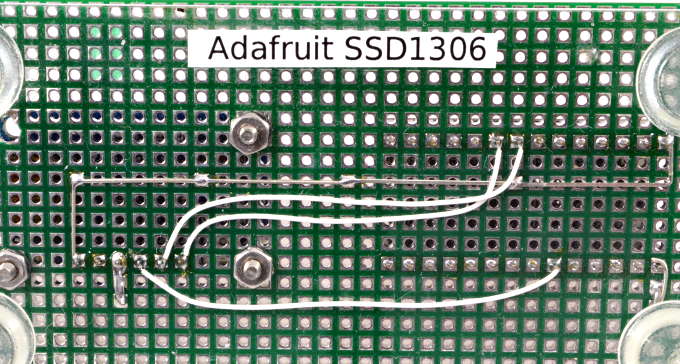
Adafruit 128x32 I2C Wiring
|
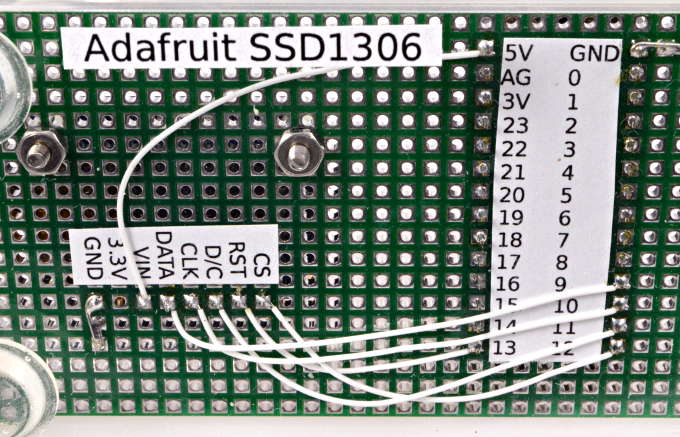
Adafruit 128x32 SPI Wiring
|
|