360pan suite is a plug-in suite for Windows and macOS designed to deliver up to third order ambisonics mixes for immersive audio: audio from all directions, intended for headphone reproduction, that stays where it is even when you turn your head.
You can do all your panning, distancing and even mixing from within the video window of your DAW (Reaper or Pro Tools HD/Ultimate). There is no need to have any plug-in interfaces open while working.
Panning and the distancing of sound sources, operated directly from the video window.
Look around and listen to your immersive mix while you are making it, instant preview. Buy the headtracker now
The 360pan plug-in suite enables you to deliver ambisonics audio, b-format AmbiX audio to be precise.
There are a lot of names for the type video that the 360pan suite can deliver this spatial (or localized, immersive, 3D) audio for:
to name the most common.
These type videos require a soundtrack that can turn when the head of the viewer with VR goggles, head-mounted-device (HMD) on, or his phone, is turned.
There are a number of playback platforms for 360 VR videos.
to name a couple.
All of these chose Ambisonics as the technology that allows for the interactively turning audio mix. This means that audio-post folks need to produce ambisonics mixes. Ambisonics mixes are in a format called b-format, which consist of four channels (for first order, nine channels for second order and sixteen channels for third order). B-format comes in two channel orders: AmbiX or FuMa.
YouTube requires AmbiX b-format ambisonics soundtracks, so this is what 360pan delivers.
Facebook requires 2nd order ambisonics, 360pan suite delivers this.
360pan enables you to pan mono, stereo or four channel input files into ambisonics, using pucks that move on top of the (Pro Tools HD/Ultimate) video window.
Gain, distance and reverb width, along with the puck itself will show up in the (Pro Tools HD/Ultimate) video window when a panner is inserted and ‘show puck’ and ‘show overlay’ are switched on. The three sliders appear when you click the three slider icon that shows when you hover the mouse over a puck in the video window.
It is possible to use the 360reverb in a traditional way using sends and busses, however it is designed to be used in a more clever way:
mono or stereo sources are converted up to ambisonics, while giving it a left-right, up-down, and distance position in the ambisonics bus. A panner is inserted on each sound source track to do this. So panners get mono or stereo (or even 4channels) of input and output ambisonics.
Each 360reverb creates a private ambisonics input, kind of a backdoor, only accessible by the 360pan instances. Each 360reverb shows up as a send destination in each 360panner. This ties the 360pan’s to the reverb in such away that you can adjust distance and reverb-width per panned source. This goes for an unlimited amount of sources even if there is only a single 360reverb in your project (which is the most usual setup).
Besides all this the usual main input of the reverb still functions (also simultaneously with the private input).
Turn position blur up to create sound-objects that should appear bigger than a point-source. The panning position will then be their center, and they will become larger in the mix.
If position blur is turned all the way up, the audio is mono and will not move at all when the listener turns his head. You can use this to mix voice-overs or (mono) music that shouldn’t move.
Pan stereo music hard left and hard right and open up position blur halfway to create a head-locked effect in an ambisonics mix, That does not require separate head-locked tracks.
360monitor scoops video frames out of the video window and sends them into a browser style drag-n-pan screen while decoding the ambisonics mix to binaural for headphones, (or 5.0) for speaker playback, so you can look around and listen to your immersive mix while you are making it.
In the picture the mix format selected is 8 channel (8 ch). This 360monitor is therefore on an eight channel bus (7.1). It folds the audio down to 2 channels for headphone listening. It does that in the way described technically in Appendix 2 ‘Ambisonics to binaural conversion’ from the 360pan suite manual.
Tip: 360monitor can be heavy on the CPU when it is visible. This is because it is transporting frames from the Pro Tools HD/Ultimate video window to the 360monitor user interface. The smaller the Pro Tools HD/Ultimate video window, the lighter 360monitor operates.
A low cost bluetooth connected head tracking unit that can be attached to your headphones and can steer the 360monitor. That more closely resembles the way your mix will be listened to by the end-user. Appendix 3 in the 360pan suite manual describes the use and calibration of the head tracker.
Please note that when you source this tracker elsewhere (not from Audio Ease) you have to ensure a battery is included.
360reverb is the first truly omnidirectional convolution reverb. A single instance can can provide pan-following reverb with individually adjustable reverb width for an unlimited amount of sound sources.
The dry/wet balance and the spread controls only function on the main (traditional plug-in) input of the reverb. 360reverb accepts ambisonics input and delivers ambisonics output. There is a separate private input that is selectable in all 360pan plug-in instances.
The dry/wet balance and the spread controls do nothing on the private audio lines each 360pan has to the reverb. The distance and reverb-width parameters for the private inputs are set in the 360pan plug-in (or through the popup faders in the video overlay).
360limiter is a first order to third order ambisonics, look ahead, brick wall peak limiter with adaptive automatic release time determination, and added EBU R128 (LUFS) loudness metering.
Your spatial audio mix will sound great compared to other mixes from other professional sources like the Google Spotlight Stories on YouTube.
Live ambisonic recordings often have a large dynamics range, where occasional peaks can prevent the user from gaining without clipping the peaks. When uploaded online (or on any other delivery platform) your mix can sound quiet compared to the rest. This is where the limiter comes into play. The 360limiter can, transparently, attenuate these peaks, enabling the user to gain the program without clipping.
360radar shows you when there is audio in your ambisonics mix or recording, but more importantly it shows where it is, all right in the video window.
The 360turner together with 360radar allows you to rotate or tilt an ambisonics recording so that misalignment and calibration errors of the microphone can be easily corrected.
The two main flavors in b-format channels are:
360pan suite, Facebook, Oculus Video, YouTube, SamsungVR and Oculus all use AmbiX b-format.
Currently some technologies use FuMa ordering as their upload requirement. If you will be using the 360pan suite to create audio for:
Then make sure you insert a 360ambix to fuma in the ambisonics channel that you bounce, in order to get the FuMa channel order (and normalization) that is required.
360pan suite works with standard AmbiX channel ordering and normailization. This means you can directly use the output of any 360pan suite plug-in as AmbiX ambisonics signal. There is no need to use convert or export plug-ins. This also allows to mix any other plug-in that supports AmbiX ambisonics audio.
360pan suite currently features the following plug-ins:
All plug-ins are available in first (1OA), second (2OA) and third order (3OA) variants (four, nine or sixteen channels).
The 360pan suite of plug-ins is protected using a single license. An iLok (second or third generation) USB key can be used however this is not required: the license can also be activated on a machine (computer) using the ilok license manager application. A free ilok.com account is required for this.
Please note:
Once you have fixed the issue, follow these rules to ensure it never returns:
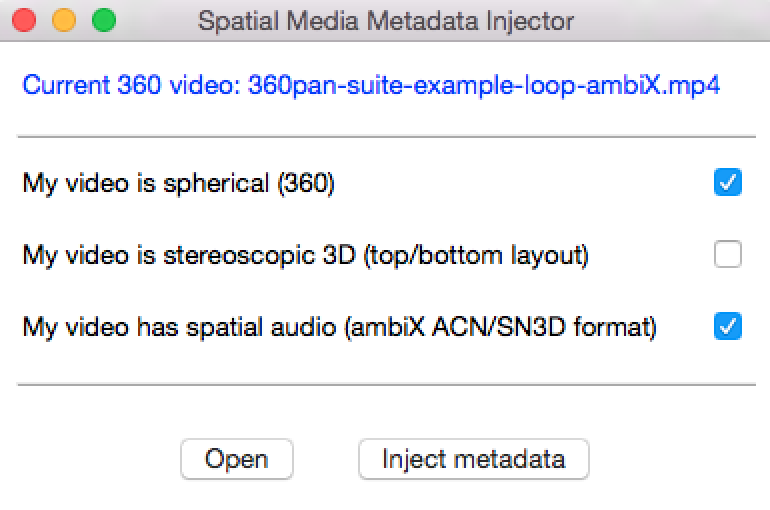
The Codex crack uses a steam emulator (steam_api64.dll and steam_emu.ini). Sometimes, the save path gets corrupted because Windows OneDrive or controlled folder access blocks the default path.
The default Codex save path is:
%SystemDrive%\Users\Public\Documents\Steam\CODEX\1551360\remote\
The Fix:
The CODEX save location is usually found here:
C:\Users\[YourUsername]\AppData\Roaming\CODEX\Forza Horizon 5
Note: If you cannot find the AppData folder, enable "Hidden items" in the View tab of File Explorer.
Once inside this folder, you will see a folder named with numbers (e.g., 502941827 or similar). This is your User ID folder.
This is the most reliable method to fix the saving mechanism for the Codex version.
Step 1: Locate the Save Directory
Step 2: Identify the Save Folder
Step 3: Modify Windows Permissions
Step 4: Fix the "Microsoft Store" Issue (Crucial Step) If the above doesn't work, the "AppInstaller" or "Gaming Services" often creates new folders automatically.
Q: Can I use a Microsoft Store/Xbox save on the CODEX version?
A: No. The file formats are different. CODEX saves are decrypted locally, while Microsoft Store saves are encrypted in the WGS folder. You cannot transfer between them directly without conversion tools, which are rare and often unstable.
Q: My game creates a new save every time I launch. Why? A: This usually means the emulator cannot access the previous save folder. Run the game as Administrator and ensure the folder permissions mentioned in Method B are correct.
Q: Where can I find a 100% save file? A: You can typically find these on gaming forums (like CS.RIN.RU) or popular save game websites (like SaveGame.Pro). Ensure you download the version specifically labeled for the CODEX release.
Summary: The key to fixing the CODEX save game is ensuring the folder name matches your emulator's generated User ID and that Windows Security isn't blocking the game from writing to that folder. Good luck, and enjoy the open roads of Mexico
How to Fix Forza Horizon 5 CODEX Save Game 100% (Progress Not Loading)
If you are playing the CODEX version of Forza Horizon 5, you might have encountered the frustrating issue where your progress stays stuck at 0% or your "100% completion" save file simply refuses to load. This is a common hurdle with cracked versions of the game due to how the emulator handles user IDs and directory paths.
In this guide, we will walk you through the definitive Forza Horizon 5 CODEX save game fix to get your progress back on track. Why Isn’t Your Save Game Loading?
Forza Horizon 5 saves progress based on a specific UID (User ID). When using the CODEX/RUNE crack, the game looks for save files in a specific folder linked to the ID defined in the Steam_emu.ini file. If the IDs don’t match, the game starts a fresh save. Step-by-Step Fix for CODEX Save Progress 1. Locate Your Current Save Folder forza horizon 5 codex save game 100 fix
The default save location for the Forza Horizon 5 CODEX version is typically: C:\Users\Public\Documents\Steam\CODEX\1551360\remote
If you are using a newer RUNE or Goldberg crack, it might be under: %AppData%\Roaming\Goldberg SteamEmu Saves\1551360\remote 2. Identify the Steam_emu.ini File
Go to your game installation folder (where ForzaHorizon5.exe is located). Look for a file named Steam_emu.ini. Right-click it and select Open with Notepad.
Search for the line: AccountId=XXXXXXXXX (The Xs represent a number). 3. Match the Folder Name to the AccountId
If you downloaded a "100% Save Game" from the internet, the folder name inside the remote directory must match the AccountId in your .ini file.
Example: If your Steam_emu.ini says AccountId=12345678, your save folder must be named 12345678.
Rename the folder inside the remote directory to match your AccountId exactly. 4. Bypass the "Cloud Sync" Conflict
Sometimes the game tries to create a new profile even if the ID matches. To force the fix: Turn off your internet connection. Delete the User.cfg file located in the save folder.
Launch the game. The game will be forced to read the local .save files rather than looking for a cloud sync. How to Install a 100% Completion Save File
If you are trying to use a downloaded 100% save file specifically for the CODEX version, follow these steps:
Backup: Always copy your original 1551360 folder to your desktop before making changes.
Download & Extract: Extract the 100% save files. You will usually see files like User_XXXX.save.
Copy-Paste: Place these files into C:\Users\Public\Documents\Steam\CODEX\1551360\remote.
Edit the INI: Ensure the AccountId in your Steam_emu.ini matches the folder name the save came with, or rename the folder to match your ID. Common Troubleshooting
Game Still Starts at Intro: Ensure the "Read Only" attribute is unchecked on your save folder. Right-click the folder > Properties > Uncheck Read-only.
Save is Corrupt: This happens if you try to use a save from a much newer version of the game on an older game build. Ensure your game is updated to the latest version.
Steam is Running: Make sure the actual Steam application is completely closed before launching the CODEX version, as it can interfere with the save path.
By following these steps, you should be able to resolve the Forza Horizon 5 CODEX save game 100 fix and get back to racing with all cars and locations unlocked.
To fix the Forza Horizon 5 (FH5) CODEX save game issue—specifically when attempting to use a "100%" completion file or migrating saves—you must ensure the save folder matches the AccountID specified in your game's configuration files. 1. Locate Your CODEX Save Path Once you have fixed the issue, follow these
Most CODEX-based repacks (including those from FitGirl) store save data in the public documents folder: Path: C:\Users\Public\Documents\Steam\CODEX\1551360
Inside this folder, you will typically find a remote subfolder containing your save data. 2. Identify the AccountID
The game only recognizes save files that match the specific ID assigned in the emulator's settings. Navigate to your FH5 installation directory. Open the steam_emu.ini file with Notepad.
Look for the line: AccountId=0 (or another string of numbers).
If you are using a new 100% save, you must find the ID number associated with that save folder and update this line to match it.
Example: If the downloaded save folder is named 12345678, change the line to AccountId=12345678. 3. Replace the Save Files Before proceeding, always back up your original files.
Delete the existing 1551360 folder (or everything inside it) in the CODEX directory.
Paste the contents of your downloaded 100% save file into that location.
Ensure the folder structure remains: ...CODEX\1551360\remote\User_ID_Folder. 4. Troubleshooting Fixes If the save is still not detected:
Check for conflicting cracks: If you recently updated the game, you may need to ensure you are using the correct crack (e.g., RUNE or CODEX). Some users report success by replacing the Goldberg crack with RUNE to fix save detection.
OnlineFix conflict: If you have an OnlineFix folder in your Public Documents, the game might be prioritizing that over the CODEX folder.
Administrator Mode: Always run the game as an Administrator to ensure it has permission to read and write to the Public Documents folder.
Are you currently seeing an "Invalid Profile" error, or is the game just starting you from the beginning of the intro?
Forza Horizon 5 players using the CODEX release frequently encounter a frustrating issue where the game gets stuck on a 100% loading screen or fails to recognize progress after swapping save files. This "fix" typically involves aligning your local save directory with the specific Steam ID configured in your emulator settings to ensure the game authenticates your profile correctly. The Core Issue: Save Identity Mismatch
The primary reason the game fails to load a "100% save" or gets stuck is a mismatch between the SteamID the save file was created for and the SteamID currently used by the CODEX emulator. If these don't match, the game treats the save as corrupted or belonging to another user, leading to an infinite loading loop. How to Fix the CODEX Save Game Loading
To resolve the 100% loading hang or fix a non-loading save, follow these steps to manually align your save data and emulator settings:
Locate the CODEX Save FolderThe default directory for CODEX saves in Forza Horizon 5 is:C:\Users\Public\Documents\Steam\CODEX\1551360\remote\.
Identify Your Save Folder IDInside the remote folder, you will see one or more folders named with a long string of numbers (e.g., 1638 or a unique user ID). Note the name of the folder containing your active save files. Update the Emulator Settings (steam_emu.ini)
Navigate to your main Forza Horizon 5 game installation folder. The Codex crack uses a steam emulator ( steam_api64
Find the file named steam_emu.ini and open it with a text editor like Notepad. Find the line that says #AccountId=0 or AccountId=0.
Remove the # (if present) and replace 0 with the numeric ID you found in the remote folder earlier. Save and close the file.
Verify Save File NamesEnsure the save files inside your ID folder are named correctly. Typically, you should see files like Version.dat and several folders or files ending in .ProfileData. Alternative Fix: Infinite Loading Loop
If your game is legitimately stuck on the loading screen and it is not a save mismatch, try these system-level adjustments:
To "fix" or apply a 100% save game for the Forza Horizon 5 CODEX version, you must correctly place the save files and synchronize the AccountId in the emulator configuration. 🛠️ Step-by-Step Fix Guide 1. Locate the CODEX Save Directory
The standard path for the CODEX release is:C:\Users\Public\Documents\Steam\CODEX\1551360 2. Prepare the 100% Save Files
Backup: Always copy your existing 1551360 folder to a safe location before making changes.
Replacement: Delete the existing remote folder inside the CODEX directory and paste the remote folder from your downloaded 100% save. 3. Sync the AccountId (Critical Step)
The game will fail to load the save if the ID in the game files doesn't match the ID in the crack configuration.
Navigate to the folder where ForzaHorizon5.exe is installed. Open the steam_emu.ini file with a text editor.
Look inside the 100% save's remote folder for a sub-folder named with a long string of numbers (e.g., 123456789). In steam_emu.ini, find the line #AccountId=0. Remove the # and replace 0 with that specific number. Example: AccountId=123456789 4. Bypass Profile Errors If you see a "Profile Error" or "Invalid Profile" message:
Ensure you are playing offline; 100% saves often conflict with online services or different cracks like Goldberg/Online-Fix.
If migrating from an Empress save, you may need to rename the files (e.g., User_XXX.ProfileData) to match the naming convention expected by the CODEX version.
💡 Pro Tip: If the save still isn't detected, check for a file named filemappings in the CODEX folder and ensure it points to the correct User_... profile data file. If you'd like to troubleshoot further: What error message (if any) are you seeing?
Are you moving a save from a different version (like Empress or FitGirl)?
Do you need help finding the specific AccountID for your downloaded file?
Forza Horizon 5 FitGirl/Codex Save Location : r/CrackSupport
If your save game data is corrupted, deleting it and starting fresh can resolve the issue. To do this:
Preview your 360 Video with immersive audio right from your own hard drive or network instantly. No upload, not public, no social media, no trickery, no jump inspector or android required.
Works in Firefox on Mac or Windows. Nudge forward and replay seems broken in Chrome, Safari won’t do a thing at all.
Because the video is nice and big it this sometimes preferred over previewing in our 360monitor plug-in.
AND the best part: you don’t need extra’s like jump, or an android phone. This page uses Omnitone, Google’s own 360 web API which means you are listening to the same ambisonics to binaural rendering as the android and desktop clients viewing YouTube use. It being Google’s also means it likes .webm. Of course none of the data compression that is going on might be happening when you actually do upload to YouTube. However this is a lot quicker (and safer!) than uploading.
The files play locally from your (network) drive, after loading the page you can pull internet and it would remain working (just to prove that nothing goes into the internet).
Point to a 360 video file. webm is preferred. You can convert to webm using one of the handy droplets
Optionally the site enables you to side-load a separate 4 channel wav audio file. Simply point to an interleaved First Order Ambisonics AmbiX .wav file (4 channels, WYXZ order), hit play, drag to turn, scroll wheel handles distance (field of view).
As hires webm conversion takes a bit of time, we like to make our webm once, and then, for each mix, we just bounce a wave file from Pro Tools HD/Ultimate and only load this separately.
Arjen, sadly, has not yet been able to type a single ffmpeg command line right in one try, so Aram built him a few droplets that will perform common tasks on videos.
The result is saved next to the input video. The ffmpeg must remain next to the droplets for them to function.
Download ffmpeg droplets for Mac OS
drop any video to convert to a quarter of the resolution and to DNxHD. This makes Pro Tools happy and spiffy. (we convert samsung gear stitched 360 stuff with this).
drop a video with 4 channel AmbiX audio (like an exported mov from protools) to make a webm version for the offline 360 video Player
drop a video / audio to get the right file to locally preview on an Android device using Google's Jump Inspector
crop a stereoscopic video to the left side only, saves cpu load and screen room.
Do yourself a favor and download this. No fiddling with installing xcode or brew to get ffmpeg installed, no terminal embarrassments, simply drag n drop video files and wait...
And of course you are free to open the apps (droplets) with the Script Editor app to check what's going on and adapt if required by taste.
Quick start: download & check out the example project / session featuring a short 360 video of us running around at Audio Ease, mono panning audio, a true ambisonics recording, binaural preview and export suggestions.
Open the practice project START and open the workflow video and practice along with the video.
For Nuendo there is a practice project available too, however there is no walkthrough instruction video. Check the Reaper VST workflow video and download the practice project to give it a try:
practice project Nuendo
Yes, two 360pan suite manuals. One for VST3 and usage in Reaper and one for AAX for usage in Pro Tools HD/Ultimate.
To kickstart your new VR/360 audio post project use one of our templates. All routing/bussing done for you already, import the audio and video and start mixing. First order (1OA), second order (2OA) and third order (3OA) templates are included.
Mixing non-turning audio, like Voice Overs, using position blur in 360pan.
The first channel of the ambisonics stream is the W channel, which goes to all virtual speakers in the ambisonics to binaural converter. This means you can place non-turning mono audio there, great for voice overs.
Position blur does this. With position blur all the way open your panning is gone and the audio is mono an everywhere, with the control all the way down the panning is very precise and the audio is a point source. With the blur parameter you can make panning less hard and create clouds of audio. This way you can position stereo input, add blur and create a stereo sensation while the audio does not turn when a users turns around in the VR.
Follow these steps to upload 360 video with ambisonics audio to YouTube. So that the viewer gets interactive turning audio when looking around in the VR video.
Here's the official YouTube guide at:
https://support.google.com
Here's our recipe:
Mix your audio and place (pan) it using the 360pan suite.
Bounce the resulting quad audio to:
- an interleaved file and ask your video producer to add this to the video
- or bounce directly to the quicktime video, using Pro Tools HD/Ultimate
In both situations bounce as quad (four channel) interleaved wave audio file (not compressed).
Then download the Spatial Media Metadata Injector app
Open your video with the quad ambisonics audio in the Spatial Media Metadata Injector app.
Check the first and last box (Video is spherical and audio is spatial, ambiX)
Inject metadata, upload to YouTube, wait an hour for your 360 video to process. Watch in a modern browser (Chrome works for sure, Firefox and Safari might work too) to verify you get spatial audio (look around with headphones on!).
Bounce or export a second order ambisonics AmbiX interleaved audio file. (this is the 9 channel output from the Audio Ease 360pan suite).
Use the FB360 encoder app. Under ‘spatial audio’ select your mix and set it to B-format (2nd order ambix). Do not check the 'From Pro Tools' checkbox.
Select your headlocked stereo output and your video and then encode to a Facebook 360 video.
If you have a Samsung GEAR VR and a compatible Android phone you can check/preview your mixes locally on the HMD without uploading (side loading). Follow this guide to get audio that will enable an immersive experience.
There are two approaches, one using a ffmpeg droplet to merge video and audio:
- export four channel AmbiX audio
- combine this with your original video by adding the audio as 4 channel AAC, you can use one of the droplets for this
- inject meta data using Google's Spatial Media Meta Data Injector app
- copy the injected video to your Android device, by using SideSync app for instance. Add it to a folder on the root of your device called "MilkVR".
- put the Android device in the Gear VR, run the Samsung VR app from the default Occulus home
- in the Samsung VR app hit the folder for local files then look under side loading and your video should be there.
Or by using the Facebook encoder app:
- export four channel AmbiX audio
- open the fb360 encode app, set this to export for YouTube video
- drop your video and audio onto the app, set the audio format to first order AmbiX
- encode
- copy the encoded video to your Android device, by using the SideSync app for instance. Add it to a folder on the root of your device called "MilkVR".
- put the Android device in the Gear VR, run the Samsung VR app from the default Occulus home
- in the Samsung VR app hit the folder for local files then look under side loading and your video should be there.