Following the success of Nuvvu Naaku Nachav, the industry tried to replicate the formula. Films like Nee Sneham (2002) and Vasantham (2003) cemented her status. In these films, her timing was impeccable. She mastered the art of the "verbal duel" with heroes like Venkatesh and Nandamuri Harikrishna. In popular media discourse, critics often noted that Aarthi Agarwal never "competed" with the male lead for screen space; instead, she complemented him, elevating the script through her reactions rather than just her dialogue.
In the current landscape of popular media, where social media followers and PR-managed images dominate, Aarthi Agarwal represents a loss of authenticity. She was raw. You could see the emotion flicker across her face without the need for heavy VFX or retakes. Her content appealed to the heart rather than the box office analytics.
Furthermore, as the film industry grapples with nepotism and star kids, Aarthi Agarwal stands out as a self-made icon. She was born in New Jersey, USA—a non-Hindi, non-Telugu speaker—who mastered Telugu diction purely through hard work. Her journey from an NRI girl to the darling of Tollywood is a narrative that popular media loves to romanticize.
Today, Aarthi Agarwal’s films remain a staple on YouTube and regional streaming platforms. Her performances in movies like Vasantham and Nenu Meeku Telusa? continue to be consumed by fans who appreciate the golden era of early-2000s Telugu cinema.
However, her enduring legacy in the context of popular media is not just her filmography; it is the narrative of her life. In recent years, as conversations around mental health, body positivity, and the ethical responsibilities of the press have gained traction, Aarthi’s story is frequently cited by digital creators, film critics, and psychologists as a prime example of what happens when an industry and its media arms fail to protect their own. Aarthi agarwal xxx
Aarthi Agarwal was a gifted entertainer who brought joy to millions through her screen presence. Yet, her story remains a haunting reminder that the entertainment content we consume, and the popular media we use to track the lives of the stars who create it, is powered by real, fragile human beings.
In the vast, churning ocean of Indian cinema, certain stars burn brightly for a fleeting moment, while others leave an indelible mark that reshapes the very fabric of popular media. Aarthi Agarwal belonged to the latter category. Though her life was tragically cut short in 2015, her body of work remains a significant case study in how entertainment content evolves, particularly within the Telugu film industry. For millennials who grew up in the early 2000s, Aarthi Agarwal was not just an actress; she was a archetype—the embodiment of the glamorous, emotionally resonant heroine who bridged the gap between traditional family dramas and the modern, globalized youth culture.
This article delves deep into the entertainment content of Aarthi Agarwal, analyzing her filmography, her unique position in popular media, and how she influenced the narrative tropes of South Indian cinema.
Aarthi attempted a comeback, starring in a few Telugu and Bhojpuri films, and even participating in a reality TV show, but the spark had dimmed. On June 6, 2015, Aarthi Agarwal passed away at the age of 31 due to complications from liposuction surgery and underlying respiratory issues. Following the success of Nuvvu Naaku Nachav ,
Her death forced a sudden, albeit temporary, shift in the popular media landscape. The very tabloids that had hounded her for years suddenly pivoted to introspection. Outlets published retrospectives mourning the "lost talent" and questioning the toxic nature of the film industry. However, for many, this posthumous sympathy felt hypocritical, highlighting the fickle nature of popular media—which often only shows kindness to entertainers after they can no longer be exploited for clicks and ratings.
To search for "Aarthi Agarwal entertainment content and popular media" is to take a journey through the golden era of Telugu cinema. It is to understand how one woman, armed with a disarming smile and incredible acting chops, defined the romantic template for an entire generation.
While her physical presence left us too early, her digital shadow looms large. Every time a young writer scripts a "girl next door" character, or a director looks for an actress who can cry beautifully while looking glamorous, they are, whether they know it or not, chasing the ghost of Aarthi Agarwal.
Her legacy in popular media is secure not because of the quantity of films she left behind, but because of the quality of the emotional connection she forged with the audience. In the annals of Indian entertainment content, Aarthi Agarwal remains undisputed—a comet that lit up the sky and whose brilliance we still admire long after it has passed. In the vast, churning ocean of Indian cinema,
If you enjoyed this deep dive into classic Tollywood, check out our related articles on the evolution of romantic comedies in South Indian cinema and the impact of 2000s actresses on modern streaming trends.
Note: Aarthi Agarwal (1984–2015) was an Indian actress primarily known for her work in Telugu cinema, with a few Hindi and Tamil films. This review analyzes her body of work, media persona, and lasting impact.
Though primarily a Tollywood star, Aarthi Agarwal’s entertainment content also touched Bollywood and Bhojpuri cinema, showcasing the porous nature of popular media in the early 2000s. Her appearance in the Hindi film Paagalpan (2001) and later the Bhojpuri superhit Nirahua Rickshawala (2008) demonstrated her versatility.
In the context of popular media, this cross-pollination was significant. It predated the current "Pan-India" star phenomenon by nearly two decades. Aarthi Agarwal understood that content was no longer regional. By stepping into Bhojpuri cinema—a massive but often overlooked market—she expanded her digital footprint and relevance. Today, memes and clips from her Bhojpuri films circulate widely on Instagram and YouTube, introducing her to Gen Z audiences who were not alive during her peak.
Aarthi Agarwal’s legacy is bifurcated:
Valid from EWA version 2.21.228.0
Created for Daimler AG
4 Startup of EWA Administration Tool
5 Starting, Stopping and Monitoring of EWA core services
6 EPC / WIS Database Maintenance
6.1 Starting and stopping the installed Databases
6.3 Enter StartKeys for EPC/WIS
7 Advanced Command line options
7.2 Update (Database and Software)
This document describes the EWA AdminTool Interface of EWA which is used to update, manage and maintain the WIS and EPC Databases as well as managing the state of the server.
Besides the software installation, the applications need to have access to certain databases for content data. This content is not installed within the setup of the software but needs to be updated after installation. The aim of this behavior is to decouple software and data update and minimize the downtime of the applications.
This document describes the use and function of the EWA AdminTool. The following use cases are documented in this description:
The EWA Administration tool can be started using the favorites menu inside the Internet Explorer. This entry is created during installation and is only available on the server.
Picture 1: Start of EWA Administration tool using the favorites menu
The EWA Administration tool can be only started on the EWA server. If the link to this tool is not available, it can be started manually using the command
[EWA_HOME]\ewa_admin\EWAAdmin.exe
where EWA_HOME need to be replaced with the directory where EWA was installed.
With the EWA Administration Tool it is possible to influence the availability of the server and see if it is running. The Administration tool acts as a service monitor and shows if the needed Windows services are running or not.
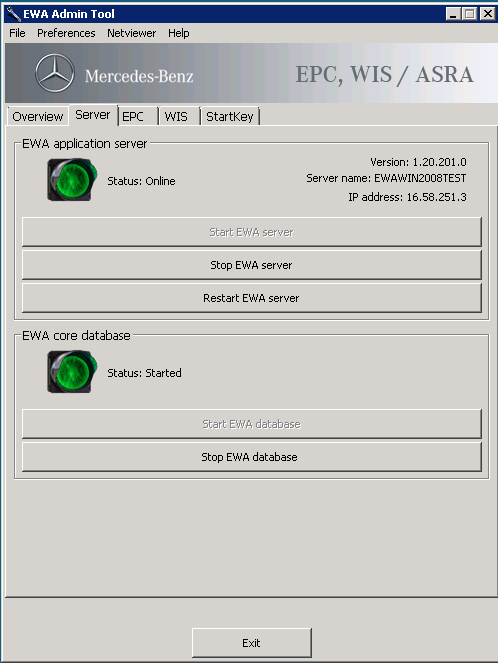
Picture 2: Service Monitor Page for the Server
Within this panel the EWA server (application server) can be started and stopped. This is more or less a shortcut for the Windows "Services" view.
Also within this panel the user management database (i.e. for specific user data, FIN Cache,…) can be started and stopped.
Note:
Database "start" and "stop" is not simply starting and stopping services. A "stop" always also stops the corresponding TransBase multiplexer service. And "start" always starts both the database engine and the TransBase multiplexer service.
If the services are stopped the application server will not be available for all users. Please take this into account when starting or stopping services.
It is possible to see the current state of the running database on the EPC / WIS net Screen in the Administration Tool. If no database is installed, the traffic light will be off. If the database itself is working and the database service shows a good status, it will show a green traffic light. Else the traffic light will show a red status.
Use the "Start" and "Stop" Buttons to shutdown / start the database and the Transbase service.
Note:
Database "start" and "stop" is not simply starting and stopping services. A "stop" always also stops the corresponding TransBase multiplexer service. And "start" always starts both the database engine and the TransBase multiplexer service.
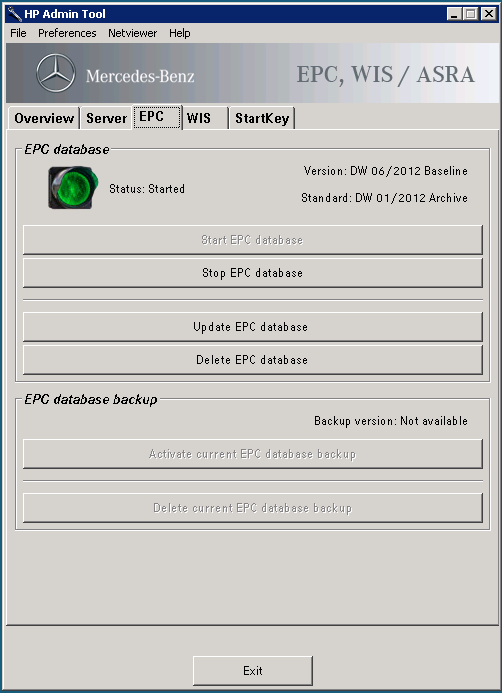
Picture 3: EPC Administration of Database
Note:
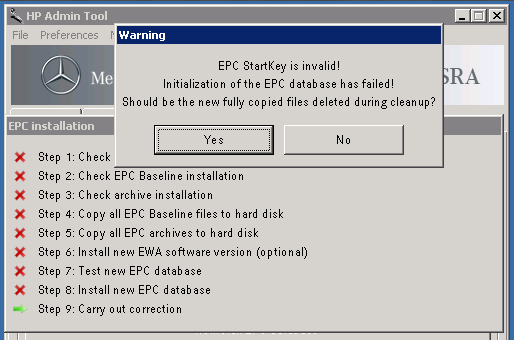
EPC / WIS database installation requires a valid StartKey. The section Enter StartKeys for EPC/WIS shows how to enter a StartKey.
To install a new database into the running application, use the "Install" button. This will start the process of copying the needed database files from DVD to hard disk and attach the databases to the running service. Once a database is installed, the button will be labeled as "Update" to indicate that this action will update the running database.
Note:
It is also possible to enter a valid StartKey using the administrative interface of the EWA web interface. To open the EWA web interface use the shortcut "EWA net" from your Favorites "EWA net" folder or directly open the URL http://localhost:9000/EWA-net. An explanation for entering StartKeys is provided in the HP User Management Administration Guide.
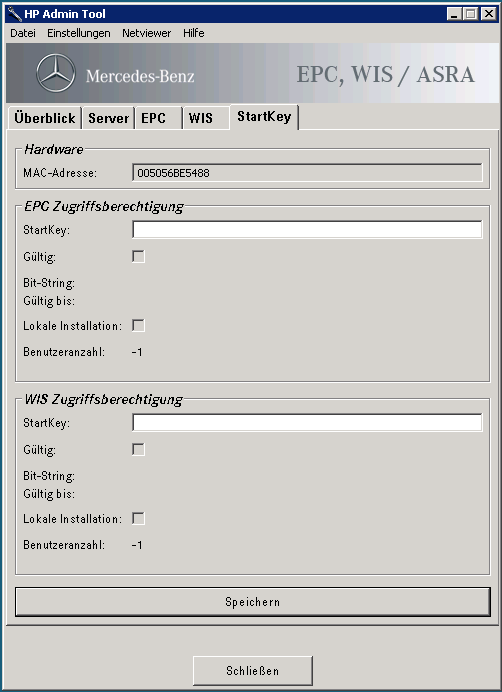
On the tab "StartKey" it is possible to enter a StartKey for EPC and WIS.
Initial installation using "archive" and "base" media
EPC requires base and archive DVDs. The archive DVD contains a set of older valid data cards. This archive media is normally published once every year and all subsequent monthly base publications are based on it. The base DVD contains newer data and relies on the data from the archive DVD.
The installation process is quite simple: The user starts the AdminTool, navigates to the EPC tab and clicks on the button "Install EPC database". The user will be prompted to insert the first update DVD of the base DVD set. Subsequently it is required to insert all archive media DVDs. After performing these DVD checks, the DVDs needs to be insert consecutively, beginning with the first update DVD of the base DVD set again in order to start copying of all files and attaching them to a new database. Afterwards the installation process finishes.
Initially inserting an archive medium instead of a base medium will lead to an error message.
After clicking the button "Install EPC database", an EPC data DVD needs to be insert. For EPC the AdminTool will try to read the "FDARequest.cfg" file which is normally in the folder "MBXX\cfg" of any data DVD.
Picture 4: AdminTool requests the data DVD configuration file
If the DVD is inserted just press "OK" - the Tool will search all available drives in PC for the configuration file. If you already had a valid data DVD of EPC in one of your DVD drives, the tool will have skipped this dialog and started installation immediately.
Note:
If the files should be installed using a network share, use the "Browse…" button and navigate to the corresponding folder on the network share and select the "FDARequest.cfg"/"WISCD000" file in the folder "MBXX\cfg"/"wis" relative from the DVD root.
The Tool will also search all hard drives and mounted Shares for data DVDs.
After the configuration file has been read successfully and the database files could be found, the tool will request to select a target drive for the database content. Select a drive where all database files should be copied to and click "OK".
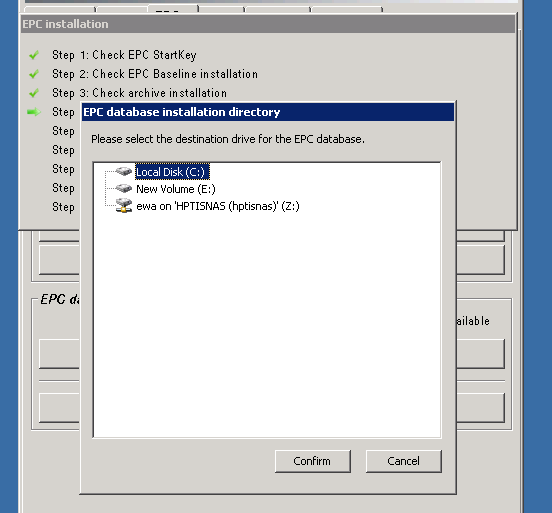
Picture 5: Selection of the target drive for database content
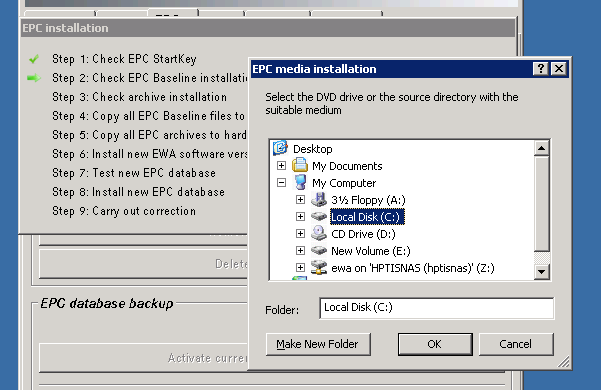
The next step in the copy process is to start to copy the ROM files to hard disk. If the source DVD can not be located in any drive of the PC, the Tool will ask for a source for copying the files.

Picture 6: Selection of ROM file source
In this dialog, please select the DVD root directory when the tool requests a file. The path inside the media is searched automatically. If a network share is used as file source, please point to the folder which corresponds to the original DVD root.
The copy process will be visualized with a progress. Please wait until all data has been copied or the Tool asks you for further media.
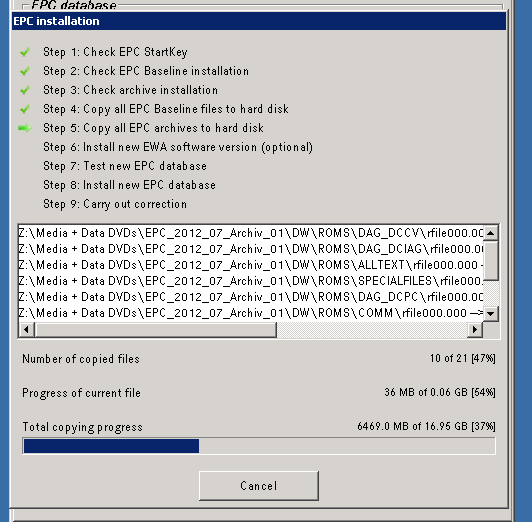
Picture 7: Copy Progress Dialog
After all database ROM files have been copied, the tool will proceed with the following steps:
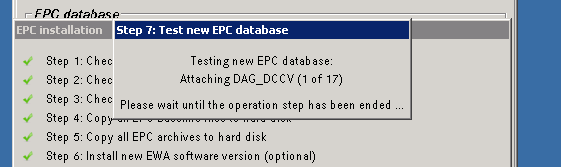
Picture 8: Database test Dialog
After these steps have been completed successfully, it will show a notification that all needed databases have been copied and activated successfully. The traffic light for the EPC / WIS database status will turn to green now.
Picture 9: Successful installation of a database
Initial installation using full version
WIS full version requires 2 DVDs. DVD 1 contains the software, the monthly published ROM files and the lucene index files. DVD 2 contains the remaining ROM files. The WIS full version media is usually published every quarter year. Based on the latest full version DVDs monthly update DVD publications are published. The update DVD has the same structure as DVD 1 of the full version.
The WIS installation process is similar to the EPC installation process. Lucene index files will be copied after all database ROM files have been copied. wis_cfg.xml will be customized to use the lucene index.
The update of database content will almost use the same installation process like the initial installation of the database.
The difference in the update step is that you are requested to insert the DVD which contains the setup into any DVD drive. During update the normal setup will be called to update software resources. Please select the appropriate folder where the setup.exe is available if the files could not be found automatically.
Note:
When updating the server, you should ensure that no user is using the applications. Users can continue working while database ROM files are being copied to the hard disk. But after finish of this process the server will be shutdown so users might lose important data.
Database can easily be deleted from the system by clicking on the "Delete" button. This button will delete the currently active database.
Note:
Be sure that you notify all users to save important data and to log off from the system as they might loose data when the database will be deleted.
When a database set was updated, the older version will be kept as backup database. With the activate database button it is possible to switch the backup and the active database. The former active database will be kept as backup.
Note:
Be sure that you notify all users to save important data and to log off from the system as they might loose data when switching the database.
This chapter is mainly intended for System Integrators who want to make use of the batch mode of the AdminTool to allow further customizing of the installation update process, one may want to make use of the command line features of the EWA AdminTool.
Note:
EWA AdminTool has been developed for the "local" environment where all software components will be installed on one single server. In a distributed environment like the "central" not all of the features described here will work.
To get an overview of the available options, just issue the following command on a command line:
"C:\Program Files\EWA net\ewa_admin\EWAAdmin" /?
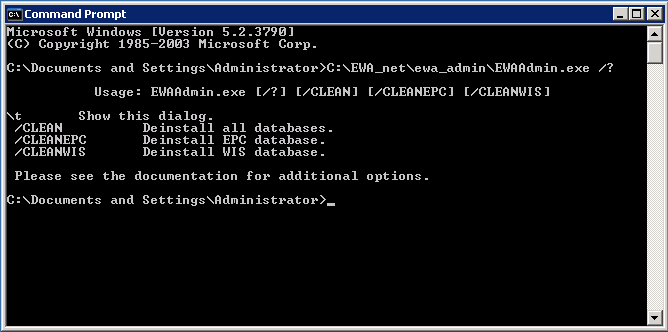
Picture 18: Help to get Usage Hints for EWA Administration Tool
This overview will not capture all options. Further options will be available here in the documentation
AdminTool allows starting and shutting down the Transbase databases individually without the need of knowledge about the special characteristics behind it. There are currently 3 databases that can be controlled:
The command line is quite easy. You specify which database you want to operate on and which operation you would like to perform: shutdown or boot. The command line for this is:
EWAAdmin.exe [/core | /wis | /epc] [/boot | /shutdown]
Description:
|
Parameter |
Description |
|---|---|
| /core |
Operate on the EWA user management database |
| /wis |
Operate on the WIS database |
| /epc |
Operate on the EPC database |
| /boot |
Boot the specified database |
| /shutdown |
Shutdown the database. This will also invalidate any open connection without reconfirmation. |
Example call:
EWAAdmin /wis /shutdown
will shutdown the WIS database.
Note:
When shutting down databases in most cases it may also make sense to shutdown the application server, too. After doing your maintenance be sure to boot the application server again.
There is no command line in EWAAdmin.exe as this can easily be achieved by issuing the command lines
net stop "EWA net Server"
to stop the application server or
net start "EWA net Server"
to start the application server again. This command must be issued on the server machine where the EWA application server is running of course.
If you want to start an update without the user being forced to start AdminTool and click some buttons you can easily start the update process from the command line. Simply select the application part you would like to operate on (WIS or EPC). AdminTool will then automatically start the update process for the regarding application.
The command line looks like this:
EWAAdmin.exe [/wis | /epc] [/license <Licensebits>] [/force] [/source <Path>] [/target <Drive>] [/nofork] [/noswupdate] [/unattended] [/v]
Description:
|
Parameter |
Description |
|---|---|
| /epc |
Update EPC |
| /wis |
Update WIS |
| /license <Licensebits> |
Optional: Note: You cannot provide a crypted StartKey here |
| /force |
Optional: |
| /source <Path> | Optional: Defines the source path from where to find and copy the database files. Te source parameter can be specified multiple times if multiple source directories are required. Besides the specified source paths the program always searched all available drives for the needed files if the file can not be found in the defined source path. |
| /target <Drive> |
Optional: |
|
/nospacecheck | Optional: Flag to specify whether the free space check on the target drive should be omitted. If specified, the program will not check for sufficient free space on target drive. |
| /nofork | Optional: In a normal call the program copies itself to %TEMP% and executes there. If the process should be watched, this parameter can be used to prohibit the copy of the application to %TEMP%. Note: When using this option the integrated software update will fail. In this case please call the software update manually! |
| /noswupdate | Optional: Enforces the program to skip consistency checks and does not run software update during database update.
Note: When using this option you have the possibility to skip a software update when installing new database content. Nevertheless is it highly recommended that you always update the software together with the database update. If you decide to de-couple the software and database installation processes this is fine - but do not forget to update the software, too. |
| /unattended | Optional: Suppresses confirmation dialogs and allows batch execution of the program |
| /v | Optional: Enables debug logging for troubleshooting (verbose mode) |
Note:
When specifying parameters containing special characters like "-" or "/" please quote those parameters.
Example:
Use
EWAAdmin.exe /source "C:\EWA-net"
instead of
EWAAdmin.exe /source C:\EWA-net
The latter one will fail as the commandline parser will think there is another parameter hidden on the commandline.
You can remove any installed databases from the system by the command line, too.
The command line looks like this:
EWAAdmin.exe [/clean | /cleanwis | /cleanepc]
Description:
|
Parameter |
Description |
|---|---|
| /clean |
Removes all (EPC AND WIS) databases |
| /cleanwis |
Removes the WIS database(s) |
| /cleanepc |
Removes the EPC database(s) |
When using the update database options in the Administration tool a process is executed which handles the database update. The following steps are processed during a database update:
If the update can proceed using a integrated update (when no major software changes are required) the application server will be down between Step 13 and Step 23. This downtime will be usually around 5 minutes. If the update check in step 4 detects that a longer downtime is required, the application will be unavailable from step 4 until step 23.
The extended mode can be used to perform EWA software updates, WIS and EPC database updates or to create or restore a user database backup.
To enable the extended navigate to the Preferences menu and choose Extended functionality
Enabling the Extended functionality implies that the Extended tab is visible.
Note:
After starting the AdminTool the Extended functionality is disabled by default.
To perform a software update only use the button Start software update. No database update will be performed. If you want to ignore unstoppable EWA Services check Ignore stopping of EWA Services.
To perform database updates for EPC or use the button EPC Update or WIS Update. No software update will be performed unless you check Execute integrated Software-Update (if available)
If you want to force to copy any existing rom file again check Recopy romfiles that are already in place?
To create a core database backup use the button Create core backup.
To restore the selected core database backup use the button Restore core backup.
If you want to choose a backup that is not shown in the list of available backups use the buttonSelect another core backup.
In order to delete a core backup from the list of available backups use the button Delete backup.
Note:
You can restore backups that have been created with one of the following EWA tools:
- AdminTool
- Backup and Migration Tool
- EWA Web interface
If the EWA Administration tool is not working, please use the following steps to determine why the application is not working: